An in-depth article for Geographical magazine about the equipment choices for my crossing of Iceland (trip report).
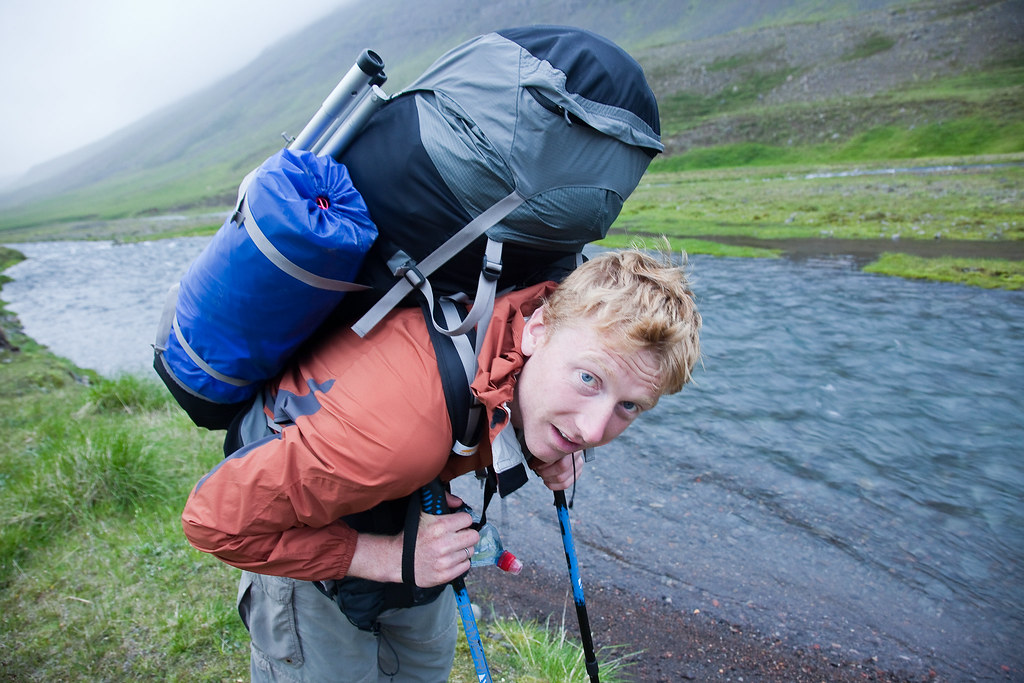
With aching shoulders and tired legs, we spent each day cursing the weight of our packs. The rucksacks, which contained all of our equipment and 25 days’ food, weighed 40 kilograms apiece. And yet each evening, as I scraped every last morsel from my boil-in-the-bag meal, I bemoaned the fact that I was permanently hungry and wished that we had brought more food.
But today was different. We descended from the Hofsjokull glacier to the headwaters of the Thjorsa river. There we inflated small packrafts, strapped our backpacks onto the bows, and let the racing glacial waters whisk us swiftly on our way. Things suddenly felt a lot more enjoyable and exciting.
Coast to coast
Together with Chris Herwig, my expedition partner and photographer, I had set out to try to cross Iceland. The plan was simple: we would hike inland from the coast, carrying all of our food and gear. When we reached the watershed, we would inflate packrafts and paddle down to the opposite coast. It would be a coast-to-coast journey with more variety and challenge than merely hiking.
Packrafts are inflatable boats that are sufficiently small and light to be carried long distances. I discovered them after reflecting on how I could combine several different elements that are important to me into my expeditions. These include simplicity, variety, relatively low cost and skill requirements, gaining easy access to wilderness areas, and finding projects that are challenging, rewarding and interesting but also of short duration.
Packrafting requires more kit than an ordinary trekking journey. Careful consideration of equipment is required if the benefits of having a packraft aren’t to become outweighed, literally, by the inconvenience of carrying too much stuff. Compromise and versatility are key. We could have crossed Iceland by hiking the whole way and crossing rivers at shallow points. We chose to use packrafts because they added value to our expedition by making the project more logistically and intellectually interesting. And they added excitement, difficulty and a sense of discovery without adding a large burden of complication, cost or weight.
Ingenious invention
The Royal Navy’s Lieutenant Peter Halkett built the first prototype for today’s packrafts during the 1840s. He was interested in designing a boat that was light enough to be carried, but tough enough to be used on arduous journeys in the Canadian Arctic. His first design was ingenious: when not in use, the raft doubled as a cloak, the oar as a walking stick, and the sail as an umbrella. John Franklin held the design in high regard, taking one with him on his ill-fated final expedition.
During the 1980s, packrafts began gaining popularity in long-distance adventure races in Alaska, and Alaska remains at the forefront of using packrafts on non-motorised, long-distance, cross-country journeys.
Modern packrafts sit somewhere between a child’s rubber dinghy and a whitewater-rafting boat. Prices vary correspondingly, from cheaper boats designed to help you cross an occasional lake or wide river, right up to extremely robust, and more expensive, rafts capable of taking on serious whitewater.
If you want to try something basic before investing too heavily, then look at boats made by Sevylor. And if weight is more important to you than performance, try FlyWeight Designs. Their new FlytePacker weighs a smidgen over one kilogram, but can hold 140 kilograms. At the other end of the scale, the African River Kraft Gecko is a heavier and tougher option.
I used Alpacka’s Denali Llama raft for the Iceland crossing. Chris is shorter than me, so chose the Alpacka Yak. Our boats were supplied with ingenious inflation bags (enabling them to be blown up in a couple of minutes) and fitted with spray decks, which are essential for whitewater paddling.
We bashed our boats on rocks, scraped them down shallow glacial floodplains, capsized them in big waves, and even sheltered beneath them in a sudden hailstorm. On the water, they were impressively stable, forgiving and comfortable. Off the water, they were light and easy to portage around waterfalls too difficult for our paddling capabilities. And they packed down to about the dimensions of a roll mat for stowing in the backpack. A repair kit of Tyvek tape, cable ties, Aquaseal, gaffer tape, a needle and dental floss should be all you ever need to repair a packraft in the field.
A buoyancy aid is essential for all water activities. As with much of the kit described here, you’ll need to balance several factors when deciding which design suits your needs. These include weight, bulk, foam versus inflatable, the water conditions and temperature, and, not least, your own competence as a paddler and swimmer. We used inflatable buoyancy aids and manually inflated them so that they were always inflated when we were on the water. They’re lighter and less bulky than foam devices, but there’s a risk of them puncturing. Always seek specialised expert advice before buying safety equipment.
Pick your paddle
The choice of paddle also involves compromise. You need to balance cost, weight and strength with the type of water you’re planning to paddle on. Select a paddle that can be dismantled into three or four pieces for easy stowing during the non-river phases of your expedition. As packrafts can negotiate rivers less than 30 centimetres deep, you’re likely to find yourself taking on very shallow streams, particularly if you’re beginning at the river’s source. As a consequence, you often need to use the paddle to push off rocks in narrow creeks or, as on my first practice trip, for trying to smash a way through ice on a frozen river. I have also used my paddle as a clothes line and for warding off attacks from sea birds.
Packrafts can carry heavy loads on their bow. It may not look elegant, but being able to paddle a river with a mountain bike lashed to the bow of your raft, or a backpack containing all of your equipment, opens up a world of possibilities. The careful use of dry bags will keep your precious sleeping bag and camera dry, even if you capsize.
I used very light dry bags manufactured by Sea to Summit. Their low weight comes at the expense of durability, and I had to repair a couple of small holes during the crossing. Consider SealLine bags if you want something stronger.
The backpack you choose for a packrafting expedition depends, as always, on how much you need to carry. For our Iceland crossing, we were carrying food and supplies for more than three weeks, so we needed very big packs. We used GoLite Odyssey packs. These were extremely light but not as comfortable as heavier rucksacks that have more padding and support.
Clothing has to be useful on all the phases of your expedition. If you intend to paddle on white water, you’ll get very wet in a packraft. I wore GoLite’s minimalist Tumalo jacket, which weighs just 285 grams. It’s effective in rainstorms and rapids alike. I recommend it for summer expeditions, but use something thicker in colder conditions. For winter journeys, you’ll want to consider wearing a drysuit, although bear in mind the hassle of carrying it when you aren’t on the river.
In addition to waterproof trousers, a hat that insulates when wet is useful; I use a Lowe Alpine Mountain Cap. Unless you’re somewhere very hot, wetsuit booties are great in all weathers. As well as protecting your feet if you have to drag the raft across rocks, they keep your toes warm in glacial rivers. Choose a pair with a proper sole. The higher they reach up your leg, the better.
Useful pieces of kit for the packraft include a couple of bungee cords or ratcheted luggage straps for securing your pack to the boat, small carabiners for attaching small items that you may need during the day, neoprene gloves, and a throw rope and knife for rescues.
As Chris is fond of saying: ‘If you didn’t document it, it didn’t happen.’ For a dedicated stills camera, you’ll need to choose either a waterproof model, such as the Olympus Tough, or invest in a reliable waterproof case for your existing camera. As well as photographs, video footage is playing an increasingly important role in documenting expeditions. Just don’t install a dead battery in your helmet camera by mistake prior to tackling the biggest rapids of your life, as this correspondent is still bitter about doing in Iceland.
Crossing complete
At long last, the volcanoes and glaciers all lay behind us. We were tired and very hungry, and our kit was battered. Only the ocean lay ahead of us. We paddled the last few kilometres down the gravel estuary. To an audience of lounging seals, we emerged into the noisy brown waters of the Atlantic and the expedition’s end. We had crossed Iceland on foot and by packraft.
Crossing Iceland proved to be one of the most interesting and satisfying journeys that I’mve undertaken. Even before the end of the expedition, my mind was filled with ideas for other ways in which packrafts might be used on expeditions. They are strong, light, versatile and good value for money. In fact, my packraft is the best piece of kit I’mve bought in years.
Practice makes perfect
The first outing was supposed to be gentle. But crossing Scotland from coast to coast in the coldest winter for many years turned out to be a much tougher packrafting debut than expected.
A friend and I began hiking from Morar on the west coast of Scotland. We intended to walk to the source of the River Spey and then continue downstream by packraft to the east coast. It had not, however, crossed my mind that a British river would be frozen solid for its first 50 kilometres: it was definitely a cold winter.
Once we finally took to the water, we found ourselves paddling among icebergs. Loch Insh was also frozen, so we had to drag our rafts around it across snowy fields. Our short trip in Britain was turning into an epic.
I learned a lot about packrafting technique, and that hands and feet suffer badly from the cold on rivers; that packrafts are exhausting and inefficient on flat water, and fun and reliable in swifter streams; that packrafts enable the user to experience familiar environments in different ways; and that wearing a drysuit makes going to the toilet rather complicated. But in the end, this eight-day trip opened my eyes to the exciting potential for using packrafts on longer expeditions.
TIPS FOR YOUR FIRST PACKRAFTING TRIP
UPDATE: read about my greatest packrafting adventure across Iceland here.
My favourite purchase of the last few years has definitely been my packraft. I love it for many reasons which I will outline below. But I also love it because almost everyone I tell about it asks, “what’s a packraft?â€
I always like being ahead of the herd rather than hot on its heels and it’s fun to be teaching myself something new and having to figure things out for myself.
A packraft is basically a rubber dinghy for grown-ups. It’s a small, inflatable boat that packs down small enough so that you can carry it in a backpack until you reach your river. Then you blow up the boat, hop in, and take your adventure downstream.
There are a range of packrafts available, according to your needs.
- For cheap and cheerful, or to try out the concept, look at www.sevylor.com
- For really lightweight boats turn to www.flyweightdesigns.com
- The toughest, but priciest, option is www.alpackaraft.com
I used an Alpacka raft for my crossing of Iceland. But before taking on that trip (40kg pack containing 30 days’ of food, hundreds of miles of hiking, Grade 4 rapids) I began with something more gentle. I recommend you do the same.
It is best not to think of a packraft just as an inflatable canoe: they are not as good as canoes or kayaks on the water. Packrafts are all about compromise. They allow you to combine hiking or biking plus paddling on the same adventure. They are quick to inflate and deflate and relatively light to lug around. They are worse than kayaks. They are heavier than normal hiking. But they combine kayaking and hiking into one sweet adventure!
The great thing about packrafts is their versatility – they are ideal for weekend trips in the local countryside, for crossing wide rivers on big hikes, or for journeys involving a lot of paddling through rugged, remote terrain. Your imagination is the limit!
Here then are my tips for your first packrafting adventure:
- It’s all about compromise. Take clothes that you can walk in and also paddle in. You will get wet! Waterproof top and bottoms are not as good as a drysuit, but they are lighter. Merino undies will become your best friends.
- Rubber booties are a great additional extra to take with you.
- Normal water rules apply: it’s a risky thing to do alone. Travel in a pair. Scout ahead. Work out a system of paddle and whistle signals to communicate with.
- The best trips involve a good mix of hiking and rivers. If you can incorporate two different rivers into your project then that’s even better.
- Rig a line around the raft to act as a safety grabline. But make sure to learn about the dangers of trailing lines and underwater snag hazards.
- You can carry loads of gear on a packraft. It’s the walking phase you need to bear in mind when packing – even though they are lightweight options packrafts still add considerable weight to your load (boat, collapsible paddle, buoyancy aid etc)
- Have plenty of karabiners to keep things clipped on.
- Do a test trip first – one that involves some hiking, some paddling and one night under canvas. You’ll quickly learn gear requirements that way.
- Start gentle. Rafts are very forgiving to amateur paddlers, but still you should be careful. My first ever paddle was down water with icebergs floating along. Not smart!
- Read Roman Dial’s Packrafting book if you want to learn things properly.
EXPEDITION KIT LIST FOR ICELAND
I have had quite a few questions concerning the equipment we used for crossing Iceland. Here then is the kit list. If I had more cash or was more of a gear geek then I would change a couple of things. But I hope that it proves helpful. I’mve added links where I think they would be useful.
PACKRAFTING KIT
Alpacka Denali Llama Packraft with spraydeck and seat fitted
3 part paddle
Bowline fitted to boat
Straps to tie rucksac onto boat
Small karabiners
Repair kit
Drybags – 1 for camera kit, 1 medium sized, 1 enormous (90l) for whole pack
Inflatable Lifejacket
Wetsock booties
Neoprene gloves
Throw Rope
CLOTHES ETC
Hiking Boots
Waterproof Jacket
Waterproof Trousers
2 pairs socks
1 pair trousers
Thermal underwear
Down jacket
1 shirt
1 fleece
Wooly Hat
Buff
Sun hat
Sunglasses
Suncream
Head net for flies
Needle and dental floss for sewing
Cable ties
Gaffa tape
Toothbrush and toothpaste
Passport
Credit card
Mobile phone (no charger, so only turned on if needed)
TREKKING AND CAMPING KIT
90 litre rucksack. See this post on the best expedition backpacks
Trekking poles
Crampons
Tent
Sleeping quilt [like a sleeping bag but only the top half]
3/4 length Thermarest
MSR Dragonfly Stove
Small MSR titanium pan
1.5litres of fuel bottles and Coleman fuel
Spoon
Folding Mug
Lighter x2
Food: each day we shared a pan of oats with a few raisins for breakfast. In the day we ate two chocolate bars, a handful of nuts, an inch of salami, and a dehydrated evening meal. We were hungry!
Water bottle
Penknife
Diary and pen
Book to read and use as toilet paper
Head torch (didn’t need this at all, but it seemed wrong to go without one)
Map case
Maps
Compass
First aid: zinc oxide tape and painkillers
CAMERA KIT
2x Canon 5D Mk II
Lenses: 17-40 f4, 35mm f1.4, 75-300mm f3.5-5.6, 24-105mm f4
Carbon fibre tripod
ND filters
12 batteries
280GB memory cards
folding solar charger
Go Pro Hero HD camera
Go Pro battery
32 GB SD cards for Go Pro
Olympus tough camera, batteries and cards (as back-up)
Microphone and 9V battery
Audio recorder

Am loving the thought of a bit of Packrafting, never heard of one before but am now on the lookout for one and then look for an opportunity to get out there and use it.
Was talking about your microadventures with some of my colleagues at work and how I would love to adapt it for some of the young people that I work with.
Keep up inspiring ides in people.
I’d like to know more about how you detect that a waterfall is coming up, is it usually the water speed or some other quality of the water changing, the sound of the falls, the spray, or can you actually see the water dropping off. What usually comes first? Have you ever fallen over one? Or come close? Or is it normally pretty easy to avoid?
It’s as simple as listening for the roar and looking for a flat, distinct horizon up ahead…